Hi Dave,
To do the job properly, you are going to have to take out the aileron and a
irbrake pushrods anyway, so not much more of a job to grind / sweat off the
tufnol block at the same time. Take measurements as to where the block is
so you can replace it in exactly the same position. Best to keep to what ha
s been tested / proven ?
Make up some sort of jig so you can find the hole for the aileron belcrank
pivot after the tang has been covered with the carbon wrap [ you will need
a longer bolt
after the wrap ?]
The Instructions imply the carbon cloth goes into and ends in the corner, I
didn't like all that extra stiffness stopping in one place, so I took the
4 side plies [ front and rear face] around the corner, onto the root rib, s
tepping them off at 2'', 1.5'', 1'', .5'', and finished the 4 wraps in the
corner.
Here's the tip regarding laying up the carbon cloth.... carbon is black and
shiny when it is dry, and black and shiny when it is wet, so how does the
laminator know if he [ or she] has got it all wet ?
Weighing out the cloth and using the same amount of resin is one way, but t
here may [ will] be areas that will end up too dry, especially if wetting i
t uphill from underneath....... where a fair amount of resin will go up you
r arm !
Get some medium weight clear polythene sheet. Wash / wipe any release film
contaminates off with paper towel and acetone.
Make a card template for the side plies, and the wrap plies to use to draw
round.
Draw on the finished shape of each lay up onto the poly' with a ball pen,
do this for every individual ply, and cut them out with a couple of inches
to spare all around. Cut out the same number of blank pieces the same size
.
Turn the poly' over onto a poly' covered bench so the pen ink is on the und
erside, place the precut [ slightly oversize] carbon cloth on top of the p
oly', so it overhangs the pen line, and pull the fibres about to get it all
square and even. [the carbon is far looser in weave, it goes out of shape
easier, but not as soft to go round corners.]
Wet the carbon cloth initially with a brush, dibbing rather than brushing s
o as not to disturbthe weave, when it is wet and stuck to the poly', give i
t a gentle go over with a foam roller. Cover that with one of the plain she
ets of poly', and squeegee through the poly' so it goes clear and you can s
ee no dry weave areas thru it. Flip the poly' cloth sandwhich over and sque
egee it on the other side until there are no visible dry weave areas, you c
an chase the exess resin about to wet out any dry areas. Once it looks all
wet, squeegee quite hard to wipe out the exess out of the sandwhich, and sc
oop up that resin off the bench back into your pot.
Flip the sandwhich back over, and cut through all of it with SHARP scissors
, to the pen line which will just about be visable in good light. Bin the o
ffcut, you now have a poor mans prepreg ! Peel off the poly from the side y
ou want to stick it on, and you can carry it onto the job, it won't stretch
/ sag / and can be placed and removed until you are happy with the positio
n. Squeegee it through the poly and chase out any air.
Peel off the poly', and then roll over the carbon with a roller made from p
lain and spring washers, to get all the air out and really mash the cloth o
nto the surface.
Wipe off the poly' covered bench to remove all resin, and start again. You
will need to put on new gloves for each ply, as you won't be able to smooth
/ stretch the cloth about with sticky gloves. Reckon on using a couple of
gallons of acetone, 2 or three paper towel rolls and 200 gloves for all of
this, with all the poly' off cuts and sheets you will fill 3 dustbin liners
!
Do a trial poly' prepreg before the real deal, to get the hang of doing it,
really makes it easy compared with trying to juggle with the cloth and wet
ting on the job. Ensure there are no creases / wrinkles in the poly, tailor
the ink lines to miss any.
Good luck,
Nev
----Original Message-----
From: djaflyact <djaflyact@gmail.com>
Sent: Wed, Oct 23, 2013 1:47 am
Subject: Europa-List: Re: MOD 78
Thanks Nev. I have ground one spar tang today. Had to quit due to roasting
in
the sun and just the mess of it. I'm wondering if anyone has done this mod
on a
flying airplane. The reason I ask is that the speed brake control tufnol bl
ock
is right there where the fiberglass is layed up against the root rib. To gr
ind
those payers off the root rib, I would ahve to remove the controls for the
speed
brakes and also the ailerons. What I was hoping to do is leave the fibergla
ss on
the spar out about 2 to 3 inches and then add the new layers as called for
in
the build manual, but only run them up the root rib where possible. Otherwi
se,
the new plies would essentially splice onto the existing pile on the root r
ib.
Where I can run them up the root rib, it would be thicker than called for i
n the
manual. There is also the issue of the glass that is holding on the wing ro
ot
fairing, which is why I'm asking about not taking off the layers that are n
ow on
the root rib.
I'm still getting lost in the terminology - roves - tows, etc. Is there a s
ource
on the internet that defines what these terms mean?
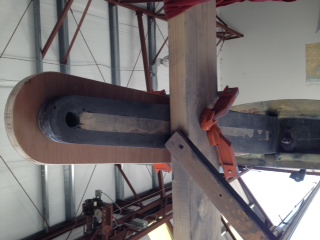
I'm attaching a photo of it now, with the intensifier board on top for scal
e.
Oh - How far does the carbon fibre cloth go toward the rot rib? ALl the way
to
the 90 degree corner?
Off to shower off the dust - you are right - it goes everywhere. I am weari
ng a
space suit and I still get it on me.
Dave
PS On one spar, There was a spot of somthing that looks almost like sap in
a
spot when I was grinding the shear web layers - toward the wing root. Like
a
pocket of sap or a pocket of something that was not cured. This is about a
12
year old spar.
Read this topic online here:
http://forums.matronics.com/viewtopic.php?p=411138#411138
Attachments:
http://forums.matronics.com//files/grinding_done_196.jpg
|