Hi Dave, [& Ron P and any other interested parties]
Couple of tricks with this,
Buy a cheap 4'' angle grinder, grinding the carbon off the spar will **** i
t completely ! Use 40 grit discs, don't let the heat build up, don't keep t
he grinder in one place for too long, wear disposable overalls, good goggle
s and mask, do the grinding outside with your back to the wind ! Finnish wi
th a Permagrit block, or 40 grit paper on a board.
Ignore the instructions re cutting the carbon tows. You will need 7 bundle
s of 16 tows, 17' long.
Set up 3 doors end to end on trestles to give you a 18'+ bench, alongside t
he wing, cover it in polythene. Set up the two reels of carbon on some sor
t of spindle at the wing tip end of the bench. Pull 2 tows off the reels an
d tape to the far [root ] end of the bench, tape the reel end of the tows
to the bench at the 17' mark, cut and pull out another pair, tape both ends
of each pair, repeat until you have 8 sets of pairs [16 tows] spread out s
o they are about 1'' wide. Unstick the tape and fold the [ 8 layers of ] ta
pe over to hold the bundle together. Move it to one side of the bench, tape
the bundle down with tension in it to keep the fibres straight. Repeat thi
s six times so you have the 7 bundles of 16 tows, 17' long.
True up the alloy flange of the mould, you may need to add more screws. Cov
er the mould with packing tape, wax and release with PVA release. Bolt moul
d to the tang [ KINK IN MOULD IS ON BOTTOM ] with a released 1/2'' bolt, wa
shers. Wind some PVC tape on the shank of the bolt to take up the bore of t
he bush hole in the spar. Trap peel ply between tang and mould, with enough
hanging out the side to be able to wrap over the new rovings and onto the
top of the tang. Open up the hole in the Intensifier to allow it to drop ov
er the nut on the bolt holding the mould to the tang. Tape / wax the Intens
ifier. Get G [C ?] Clamps ready, at least 6, with wood packing etc... do a
couple of dry runs....
2 person job.... mix the epoxy in small batches [200 grms] tape a bundle to
what will be the ''wet area'' of the polythene covered bench, held in tens
ion to keep the fibres straight, and wet out the tows with a foam roller, w
ork up and down the tows so you have a 1'' wide flat ''tape'' of rovings, g
o up and down with the foam roller several times so it is fully saturated.
Peel the bundle off the bench and pull it through fingers and thumb to remo
ve excess resin, and let it neck down to be a 5/16'' rope. Cut the rope as
described in the Instructions [ taper], wet out the peel ply in the mould s
o it is up against the side, lay the rope into the mould, start up against
the outside wall of the mould, filling in and upwards, keep the ropes as st
raight as you can [ no twisting of the ropes].Force them tight with a mixin
g stick, ensure there are no voids. Person 1 tends to the ropes in the moul
d while Person 2 mixes epoxy and wets out the bundles. When the cavity is
full, flop the peel ply over and wet out onto the top surface of the tang,
cover with polythene, fit the Intensifier and clamp it all down firmly.
Instructions tell you to cut the new tip of the tang off on the Stb tang...
.. ??? I made a end wall to the mould for the Stb tang to the correct dimen
sions so you are moulding the rovings to the required shape, keeps continui
ty of the rovings and is faster to do than sawing through the cured carbon
/ epoxy !!
Hope this helps, get back to me if any of this is not clear ?
Got a few tricks / tips for the wrap part of the Mod, will post those later
.
Cheers,
Nev
-----Original Message-----
From: djaflyact <djaflyact@gmail.com>
Sent: Thu, Oct 17, 2013 4:29 am
Subject: Europa-List: Re: MOD 78
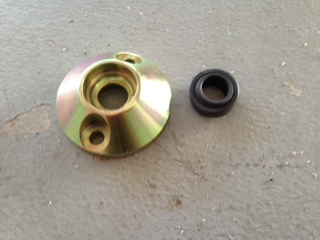
Well..... I didn't notice the two little boxes with bearings that must be
pressed into the sockets. That is the difference, because with those in the
re,
the fit to the pin is very good. That issue is solved.
I'll just say this for the record. The aviation business has always amazed
me.
When a company makes a mistake in design, the customer ends up paying the p
rice
to resolve the issue. It almost makes you wonder if companies will make mis
takes
on purpose so they can make money on the users fixing their design screw up
s. I
know the Europa is a good airplane and I am sure they did not do this on
purpose, but I just shelled out a huge amount of money for what is essentia
lly
very little hardware to fix a design problem they created. To make matters
worse, if this doesn't go right, I could end up destroying my airplane.
The airplane is great to fly. It is extremely fuel efficient. With the 914
engine, it climbs like a U2 and goes as high as I want to go. If you lose a
nd
engine, all you think about is what caused it and not the urgency of landin
g in
a field. It is the first general aviation airplane I have flown that I nee
d to
pay attention to how high I am going, because even in cruise climb of about
95
knots, it climbs about 800fpm all the way to 18,000 feet. Now if I can just
make
the wing strong enough to keep me from worrying about it breaking!
I attempted to attach a picture of the forward socket with the little beari
ng
next to it.
I'll post updates as the mod goes forward. My plan is to start it on Monday
.
The spar is the wing, therefor it is extremely important to get this right.
The
rest is fluff.
Dave
A227
914 Motorglider 500TT
Read this topic online here:
http://forums.matronics.com/viewtopic.php?p=410727#410727
Attachments:
http://forums.matronics.com//files/fron_pin_soket_134.jpg
|